How do you build a project timeline that actually holds up?
A project timeline that holds up is one you can still trust three weeks in, after a vendor missed a date, a stakeholder changed the brief, and somebody got sick. Most timelines fail not because the format was wrong, but because they were built from optimism and never touched again. The version that survives is shorter than you think, organized around deliverables instead of tasks, honest about dependencies, and reviewed every Monday by the person who owns it.
What is a project timeline actually for?
A project timeline exists to answer two questions on any given day: are we still on track, and if not, what moves. Everything else is decoration. If the timeline cannot answer those questions in under a minute, it is too detailed or too out of date.
That framing changes what you put on the page. You do not need every subtask on the timeline. You need the milestones that define on-track or off-track, the dependencies that can knock the whole thing sideways, and clear ownership so the conversation about a slip happens with one person, not the whole team. The day-to-day work can live on a board underneath.
For small-team work, the timeline is mostly a coordination tool between people who are not in the same meeting every day. It is the artifact that lets a designer, a developer, and a vendor know what the other two are doing this week without having to ask. If your work is more about direction than dates, a team roadmap may be the better fit, and the two artifacts can coexist.
The steps that actually matter when building a project timeline
There are six steps that consistently produce a timeline that survives contact with reality. None of them are technically hard. The hard part is doing them in order and resisting the urge to skip straight to laying things out on a calendar.
1. Define the scope first, in writing
Before any dates go on the page, write down what is in the project and what is not. A paragraph is enough. The point is to force the scope conversation now, when it is cheap, instead of in week three when somebody assumed the launch included translations and somebody else assumed it did not.
This is where most timelines fail before they are even drawn. The scope is fuzzy, so the timeline is fuzzy, so when reality presses against it everything moves at once. A short, signed-off scope paragraph saves more time than any tool feature can.
2. Break the work into deliverables, not tasks
List the things that need to exist at the end. For a product launch that might be: positioning doc, landing page, pricing page, sales enablement deck, email sequence, demo video, support docs. Seven or eight deliverables, not forty tasks. Each deliverable has a clear owner and a clear definition of done.
The reason this matters is durability. Tasks change every week as the team learns more. Deliverables almost never change. If you build the timeline around deliverables, you can rearrange the tasks underneath without redrawing the whole plan.
3. Identify the real dependencies
For each deliverable, ask what has to be true before it can start, and what cannot start until it is done. Most teams have fewer real dependencies than they think. The ones that matter usually fall into three buckets: another deliverable, an external party, or a fixed external date like an event or a regulatory deadline.
Mark those clearly. The dependency on the legal review of pricing copy is the thing that will slip the launch, not the design work itself. A timeline that does not flag this is just a wish list. The PMI literature on dependency management is consistent on this: the chain, not the tasks, is where projects fail.
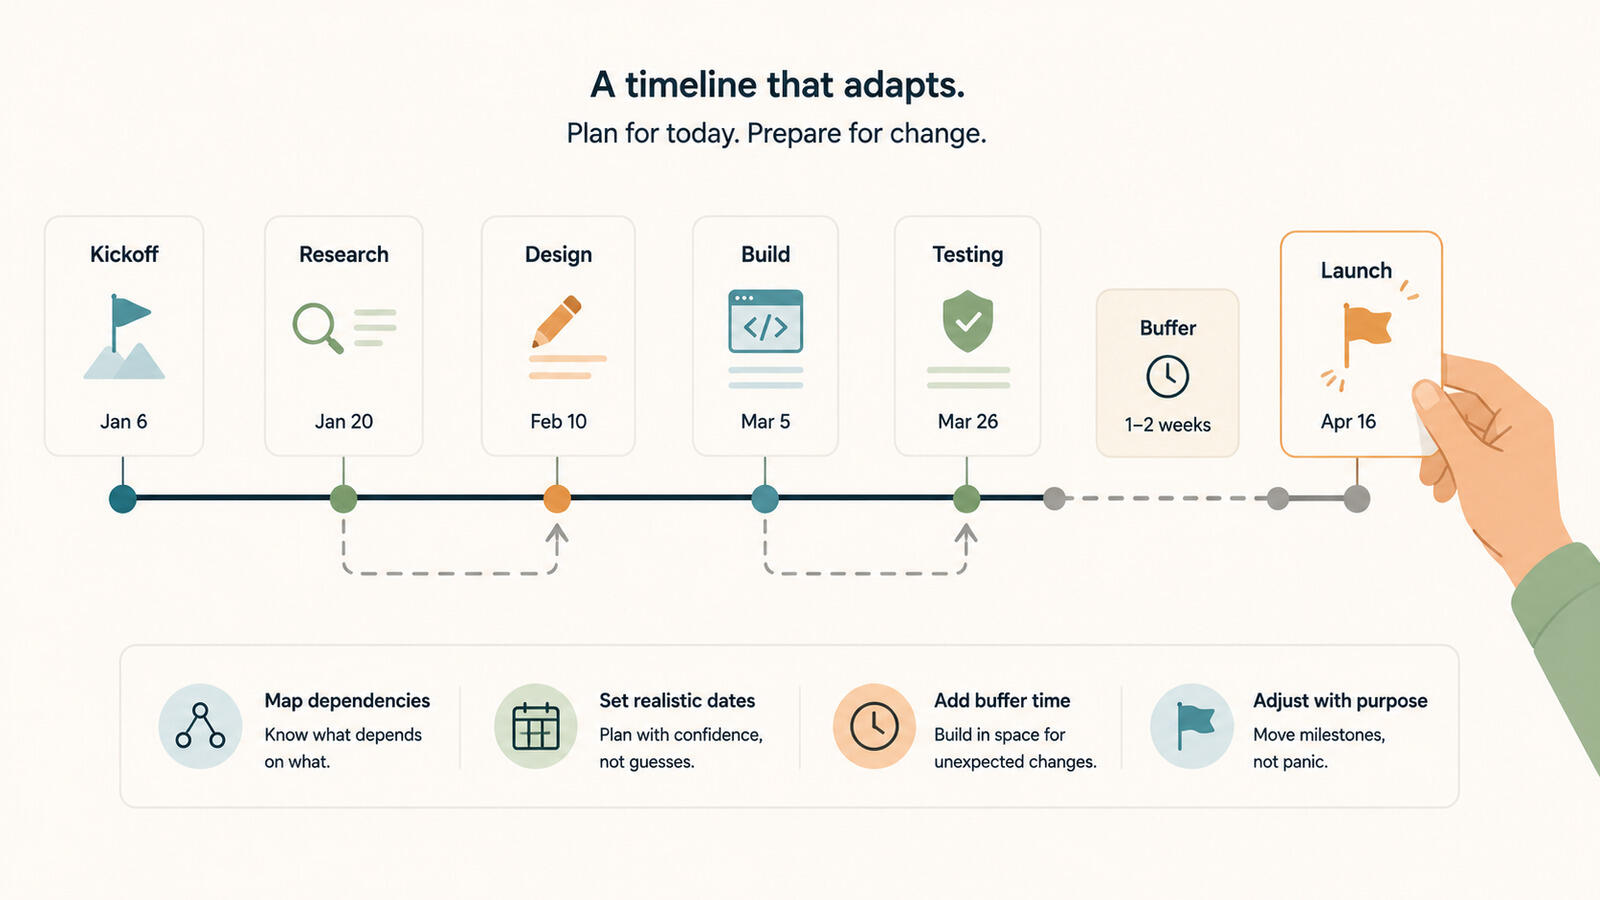
4. Estimate, then add buffer where the unknowns are
Estimate the duration of each deliverable. Be honest. If the team has built a landing page like this before, the estimate will be close. If the team is doing something for the first time - integrating with a new system, working with a vendor they have not used before, producing video for the first time - the estimate is a guess.
The mistake is to smear buffer evenly across the project. A better move is to add buffer to the specific deliverables that involve real unknowns and leave the well-understood ones alone. Twenty percent buffer on a video shoot you have never run is realistic. Twenty percent buffer on writing an email you have written ten versions of is just slack. The Standish Chaos report has shown for decades that schedule overruns cluster around the unfamiliar parts of a project, not the routine ones.
5. Pick the right level of detail
Decide what the smallest unit on the timeline will be. For a six-week project, weeks are usually right. For a six-month project, weeks make the timeline unreadable - go to two-week chunks. For anything shorter than three weeks, you probably do not need a timeline at all.
Too granular and the timeline becomes a second job to maintain. Too coarse and it stops telling you anything useful. Most teams err on the side of too much detail because it feels rigorous, then quietly stop updating it after week two.
6. Set the weekly review and assign one owner
The timeline needs an owner. One person. They look at it every Monday, mark what slipped, move what needs to move, and flag any deliverable where the dependency just got tighter. Without this habit, the timeline is dead by the end of the second week. Tying the review to a short milestone tracking rhythm keeps the cadence from drifting.
This is also where a tool starts to earn its keep. In Breeze, the timeline view sits next to the project board, so the Monday review is one click: see what is behind, drag the dates, and the board updates with it. The point is not the software, the point is that the friction of updating the timeline has to be lower than the friction of letting it rot.
Where timelines fall apart in practice
Most timelines do not fail in interesting ways. They fail in the same three ways, again and again, on every kind of project. Knowing the failure modes is most of the work.
Optimism baked into the estimates
The first failure is that the estimates assume the happy path. Nobody got sick, nothing got reworked, the client approved the first draft, the vendor delivered on time. Real projects do not look like that. A timeline built without buffer starts slipping in week one and never catches up.
The fix is not a flat percentage on everything. It is being specific about which parts of the plan have unknowns and adding buffer there. A team running a launch for the third time can estimate most of it accurately. The new piece is where the real risk lives, and that is where the buffer goes.
Nobody updates it after week two
The second failure is the more common one. The timeline gets built, shared, presented to the sponsor, and then ignored. By week three it is wrong. By week four nobody trusts it. By week five the team is running on Slack threads and standup memory.
This is almost always a habit problem, not a tool problem. Either the owner has no recurring slot to update it, or the tool makes the update painful enough that it gets put off. A fifteen-minute Monday slot and a tool where dragging a deliverable updates the board behind it is usually enough. Pairing it with a weekly time habit makes the slot stick rather than slip.
Detail collapse
The third failure is that the timeline gets too detailed too early. Every subtask ends up on the chart, and within a week it is a mess of red bars and the team is fighting the tool instead of the work.
Keep the timeline at the deliverable level and put the subtasks on a board. The timeline tells you what is happening at the project level. The board tells you what is happening this week. Mixing the two produces the unreadable plan that everyone gives up on.
When a timeline helps and when a board is better
Not every project needs a timeline. Plenty of teams build one out of habit, maintain it for a week, and quietly drop it because the project did not actually require that much structure.
A timeline genuinely helps when
The project has a fixed external deadline you cannot move - a launch date, an event, a regulatory cutoff. Multiple people or teams have to coordinate handoffs across weeks. There are dependencies on outside parties whose dates you have to plan around. The project runs longer than about four weeks. The sponsor or client expects to see a plan and progress against it.
In those situations, the cost of building and maintaining the timeline is repaid by avoided meetings and clearer handoffs. A multi-team launch without a timeline turns into a status meeting every other day, which is much more expensive.
A board is usually enough when
The team is small - two or three people who already talk every day. The project is short - under four weeks. The work is mostly parallel, with few real dependencies between people. There is no hard external deadline, just a "soon" date. The work is the kind the team has done many times before, so durations are predictable.
For that kind of project, a Breeze project board with simple columns and clear owners is faster to set up, faster to maintain, and just as accurate. Adding a timeline on top is overhead the project does not need. The honest answer is that most small-team work falls into this category and the timeline is optional.
When a timeline becomes required
A timeline stops being a nice-to-have when you cross any of these lines: more than one team contributing, a fixed deadline you do not control, vendor dependencies, or a stakeholder who needs to see commitment to dates rather than just progress. Below those lines, a board is honest work. Above them, a timeline is.
Timeline, gantt chart, or kanban board: which fits the work?
The three formats solve different problems. Picking the right one matters more than how well you execute the wrong one. A short comparison to make the choice obvious.
| Format | What it shows | Good fit for | Weak spot |
|---|---|---|---|
| Project timeline | Deliverables over weeks, with owners and key dates | Multi-week projects with a fixed end date and a handful of milestones | Becomes noise if you try to track every subtask on it |
| Gantt chart | Tasks, durations, and dependencies as a network | Complex projects where the dependency chain itself is the risk | Heavy to maintain, easy to over-engineer for simple work |
| Kanban board | Work-in-progress by status column | Ongoing work, small teams, projects with few hard deadlines | Hides the bigger picture and tells you nothing about when things finish |
For most small-team projects the right answer is a board for daily work and a lightweight timeline for the milestones. That is roughly the setup that Breeze pushes you toward, and the reason is that the two views answer different questions. The board answers what is happening today. The timeline answers whether the launch date still holds. The Atlassian work management guide arrives at the same split for the same reason.
Quick decision points before you build one
- Do we actually have a fixed end date, or just a target?
- If it is a soft target, a board is probably enough. A timeline pays off most when the end date is real and the work has to fit inside it.
- Who is going to update it every week?
- If nobody owns the weekly update, the timeline will be wrong by week three. Either assign an owner before you start or do not build one.
- How many real dependencies are there between people?
- If most of the work is parallel, a board handles it well. The moment two or three handoffs have to happen in a specific order, a timeline starts to earn its keep.
A timeline is a living document or it is nothing
The teams that get value out of project timelines are the ones who treat them as a weekly habit, not a one-time deliverable. Build it around deliverables instead of tasks, be honest about where the unknowns are, assign one owner, and look at it every Monday. If you cannot commit to the Monday habit, save yourself the effort and run the project from a board.
If you are about to start a multi-week project with a fixed deadline, the practical next step is to write the scope paragraph, list the seven or eight deliverables, and put the dates in a tool where the timeline and the board sit next to each other so the weekly review takes fifteen minutes instead of an hour. A short simple project plan sitting alongside the timeline is usually all the extra structure most teams need.